vue的使用相信大家都很熟练了,使用起来简单。但是大部分人不知道其内部的原理是怎么样的,今天我们就来一起实现一个简单的vue。
Object.defineProperty()
实现之前我们得先看一下Object.defineProperty的实现,因为vue主要是通过数据劫持来实现的,通过 get、 set来完成数据的读取和更新。
var obj = {name:'wclimb'}
var age = 24
Object.defineProperty(obj,'age',{
enumerable: true, // 可枚举
configurable: false, // 不能再define
get () {
return age
},
set (newVal) {
console.log('我改变了',age +' -> '+newVal);
age = newVal
}
})
> obj.age
> 24
> obj.age = 25;
> 我改变了 24 -> 25
> 25
从上面可以看到通过 get获取数据,通过 set监听到数据变化执行相应操作,还是不明白的话可以去看看Object.defineProperty文档。
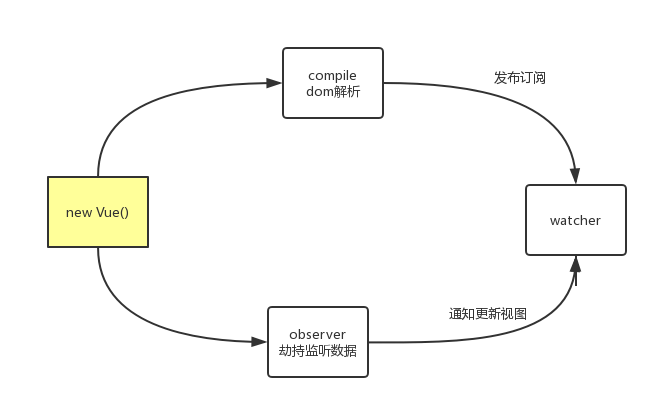
流程图
html 代码结构
<div id="wrap">
<p v-html="test"></p>
<input type="text" v-model="form">
<input type="text" v-model="form">
<button @click="changeValue">改变值</button>
{{form}}
</div>
js 调用
new Vue({
el: '#wrap',
data:{
form: '这是form的值',
test: '<strong>我是粗体</strong>',
},
methods:{
changeValue(){
console.log(this.form)
this.form = '值被我改变了,气不气?'
}
}
})
Vue 结构
class Vue{
constructor(){}
proxyData(){}
observer(){}
compile(){}
compileText(){}
}
class Watcher{
constructor(){}
update(){}
}
-
Vueconstructor构造函数主要是数据的初始化 -
proxyData数据代理 -
observer劫持监听所有数据 -
compile解析dom -
compileText解析dom里处理纯双花括号的操作 -
Watcher更新视图操作
Vue constructor 初始化
class Vue{
constructor(options = {}){
this.$el = document.querySelector(options.el);
let data = this.data = options.data;
// 代理data,使其能直接this.xxx的方式访问data,正常的话需要this.data.xxx
Object.keys(data).forEach((key)=> {
this.proxyData(key);
});
this.methods = obj.methods // 事件方法
this.watcherTask = {}; // 需要监听的任务列表
this.observer(data); // 初始化劫持监听所有数据
this.compile(this.$el); // 解析dom
}
}
上面主要是初始化操作,针对传过来的数据进行处理。
proxyData 代理 data
class Vue{
constructor(options = {}){
......
}
proxyData(key){
let that = this;
Object.defineProperty(that, key, {
configurable: false,
enumerable: true,
get () {
return that.data[key];
},
set (newVal) {
that.data[key] = newVal;
}
});
}
}
上面主要是代理 data到最上层, this.xxx的方式直接访问 data。
observer 劫持监听
class Vue{
constructor(options = {}){
......
}
proxyData(key){
......
}
observer(data){
let that = this
Object.keys(data).forEach(key=>{
let value = data[key]
this.watcherTask[key] = []
Object.defineProperty(data,key,{
configurable: false,
enumerable: true,
get(){
return value
},
set(newValue){
if(newValue !== value){
value = newValue
that.watcherTask[key].forEach(task => {
task.update()
})
}
}
})
})
}
}
同样是使用 Object.defineProperty来监听数据,初始化需要订阅的数据。
把需要订阅的数据 push到 watcherTask里,等到时候需要更新的时候就可以批量更新数据了。?下面就是遍历订阅池,批量更新视图:
set(newValue){
if(newValue !== value){
value = newValue
// 批量更新视图
that.watcherTask[key].forEach(task => {
task.update()
})
}
}
compile 解析 dom
class Vue{
constructor(options = {}){
......
}
proxyData(key){
......
}
observer(data){
......
}
compile(el){
var nodes = el.childNodes;
for (let i = 0; i < nodes.length; i++) {
const node = nodes[i];
if(node.nodeType === 3){
var text = node.textContent.trim();
if (!text) continue;
this.compileText(node,'textContent')
}else if(node.nodeType === 1){
if(node.childNodes.length > 0){
this.compile(node)
}
if(node.hasAttribute('v-model') && (node.tagName === 'INPUT' || node.tagName === 'TEXTAREA')){
node.addEventListener('input',(()=>{
let attrVal = node.getAttribute('v-model')
this.watcherTask[attrVal].push(new Watcher(node,this,attrVal,'value'))
node.removeAttribute('v-model')
return () => {
this.data[attrVal] = node.value
}
})())
}
if(node.hasAttribute('v-html')){
let attrVal = node.getAttribute('v-html');
this.watcherTask[attrVal].push(new Watcher(node,this,attrVal,'innerHTML'))
node.removeAttribute('v-html')
}
this.compileText(node,'innerHTML')
if(node.hasAttribute('@click')){
let attrVal = node.getAttribute('@click')
node.removeAttribute('@click')
node.addEventListener('click',e => {
this.methods[attrVal] && this.methods[attrVal].bind(this)()
})
}
}
}
},
compileText(node,type){
let reg = /\{\{(.*?)\}\}/g, txt = node.textContent;
if(reg.test(txt)){
node.textContent = txt.replace(reg,(matched,value)=>{
let tpl = this.watcherTask[value] || []
tpl.push(new Watcher(node,this,value,type))
if(value.split('.').length > 1){
let v = null
value.split('.').forEach((val,i)=>{
v = !v ? this[val] : v[val]
})
return v
}else{
return this[value]
}
})
}
}
}
这里代码比较多,我们拆分看你就会觉得很简单了。
首先我们先遍历 el元素下面的所有子节点, node.nodeType===3 的意思是当前元素是文本节点, node.nodeType===1 的意思是当前元素是元素节点。因为可能有的是纯文本的形式,如 纯双花括号就是纯文本的文本节点,然后通过判断元素节点是否还存在子节点,如果有的话就递归调用 compile方法。下面重头戏来了,我们拆开看:
if(node.hasAttribute('v-html')){
let attrVal = node.getAttribute('v-html');
this.watcherTask[attrVal].push(new Watcher(node,this,attrVal,'innerHTML'))
node.removeAttribute('v-html')
}
上面这个首先判断node节点上是否有 v-html这种指令,如果存在的话,我们就发布订阅,怎么发布订阅呢?只需要把当前需要订阅的数据 push到 watcherTask里面,然后到时候在设置值的时候就可以批量更新了,实现双向数据绑定,也就是下面的操作:
that.watcherTask[key].forEach(task => {
task.update()
})
然后 push的值是一个 Watcher的实例,首先他new的时候会先执行一次,执行的操作就是去把 纯双花括号-> 1,也就是说把我们写好的模板数据更新到模板视图上。
最后把当前元素属性剔除出去,我们用 Vue的时候也是看不到这种指令的,不剔除也不影响。
至于 Watcher是什么,看下面就知道了。
Watcher
class Watcher{
constructor(el,vm,value,type){
this.el = el;
this.vm = vm;
this.value = value;
this.type = type;
this.update()
}
update(){
this.el[this.type] = this.vm.data[this.value]
}
}
之前发布订阅之后走了这里面的操作,意思就是把当前元素如: node.innerHTML = '这是data里面的值'、 node.value = '这个是表单的数据'。
那么我们为什么不直接去更新呢,还需要 update做什么,不是多此一举吗?其实 update记得吗?我们在订阅池里面需要批量更新,就是通过调用 Watcher原型上的 update方法。
效果
在线效果地址:http://www.wclimb.site/myVue,大家可以浏览器看一下效果,由于本人太懒了, gif效果图就先不放了,哈哈??
完整代码
完整代码已经放到 github上了 -> https://github.com/wclimb/MyVue
参考
-
剖析Vue原理&实现双向绑定MVVM
-
仿Vue实现极简双向绑定
欢迎关注 SegmentFault 微信公众号 :)


文章评论