在下方公众号回复【面试宝典】,可获取给你整理的107页前端面试题。

前言
记得几年前刚做前端开发的时候,跟着师傅用纯 es5 实现了这款坦克大战,可以说我入行前端是从 javaScript 小游戏开始的,时间已匆匆过去了数年,前端发展日新月异,各种新框架、新概念层出不穷,很容易就迷失在对各种新技术的盲目学习和应用中,真正的编程是什么呢?值得思考的问题。
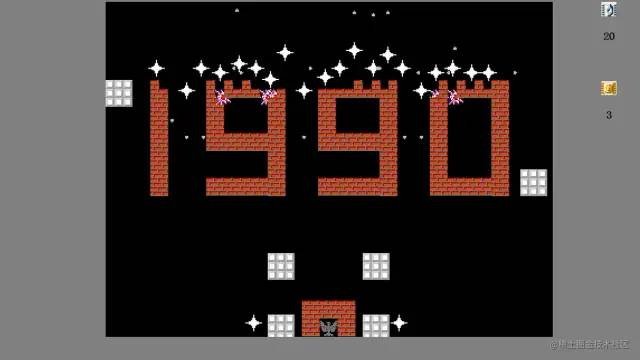
我准备用 vue3 重新实现一下这款游戏,顺便回顾和梳理下自己的知识体系。
W/上 S/下 A/左 D/右 F/射击
让我们开始吧!
架构搭建
项目技术选型为 vue3、vite、less、pnpm、ts,按照vue3 官网文档来新建项目,注意:虽然我用了 vue3 实际上只是强行尝鲜,主体内容都是 js 用到的框架特性有限。
$ pnpm create vite <project-name> -- --template vue
$ cd <project-name>
$ pnpm install
$ pnpm add -D less
$ pnpm dev
Canvas 构造函数
游戏的核心为 canvas 画布和坦克元素,我们定义两个构造函数
canvas 构造函数的定义参数、方法:dom、dimension 尺寸、renderTo 渲染函数、drawText 文本绘制函数、drawImageSlice 图片绘制函数
画布绘制
canvas 图层按照一般的游戏设计优化理念,需要为静态背景和动态元素单独用不同的 canvas 图层表示,每次更新时只需要重新绘制动态元素就好了,我抽象出一个渲染函数
// 渲染
this.renderTo = function renderTo(container_id) {
  if (!is_rendered) {
    let container = document.getElementById(container_id)
    //画布起始坐标
    dom = document.createElement('canvas') // 创造canvas画布
    dom.setAttribute('class', 'canvas')
    ctx = dom.getContext('2d')
    dom.setAttribute('width', container.clientWidth)
    dom.setAttribute('height', container.clientHeight)

    // 画布尺寸
    dimension = {
      x: container.clientWidth,
      y: container.clientHeight,
    }
    container.insertBefore(dom, container.firstChild) // 插入cantainer容器
  }
}
文本渲染
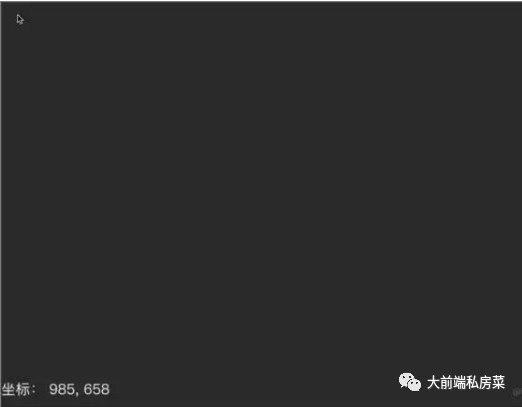
想要知道画布中的具体位置坐标,可以定义一个函数,当鼠标滑动时候执行来将当前位置坐标绘制出来
this.drawText = function drawText(text, offset_left, offset_top, font) {
  ctx.font = font || '25px Calibri'
  ctx.fillStyle = '#fff'
  ctx.fillText(text, offset_left, offset_top)
}
画布重绘前的 clear
每次重绘前需要先擦掉整个画布
this.clear = function clear() {
  ctx.clearRect(0, 0, dimension.x, dimension.y)
}
核心:绘制函数
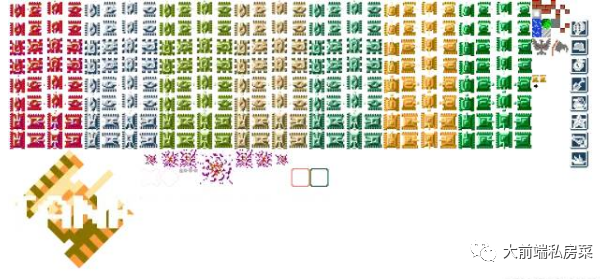
坦克、子弹、建筑等元素等绘制都是通过这个函数来完成的,实现远离是利用来雪碧图,通过坐标抓取特定位置的图片元素来获取各种不同坦克等元素的UI;
通过 rotate 旋转元素来实现坦克的转向;
this.drawImageSlice = function drawImage(img_ele, sx, sy, sWidth, sHeight, x, y, rotatation) {
  ctx.save()
  ctx.translate((2 * x + sWidth) / 2, (2 * y + sHeight) / 2) // 改变起始点坐标
  ctx.rotate((Math.PI / 180) * rotatation) // 旋转
  x = x || 0
  y = y || 0
  ctx.drawImage(img_ele, sx, sy, sWidth, sHeight, -sWidth / 2, -sHeight / 2, sWidth, sHeight)
  ctx.restore() // 复原
}
BattleCity 构造函数
BattleCity 构造函数定义坦克的各种配置信息,和方法函数
let TankConfig = function (cfg) {
  this.explosion_count = cfg.explosion_count
  this.width = cfg.type.dimension[0]
  this.height = cfg.type.dimension[1]
  this.missle_type = cfg.missle_type || MISSILE_TYPE.NORMAL
  this.x = cfg.x || 0
  this.y = cfg.y || 0
  this.direction = cfg.direction || DIRECTION.UP
  this.is_player = cfg.is_player || 0
  this.moving = cfg.moving || 0
  this.alive = cfg.alive || 1
  this.border_x = cfg.border_x || 0
  this.border_y = cfg.border_y || 0
  this.speed = cfg.speed || TANK_SPEED
  this.direction = cfg.direction || DIRECTION.UP
  this.type = cfg.type || TANK_TYPE.PLAYER0
}
实现坦克的移动
用键盘的 W、S、A、D、来表示上下左右方向键,按下键盘则会触发对应坦克实例的 move 函数,用于计算移动后的位置坐标信息,注意:对边界条件的判断,不可使其超出战场边界。
  CanvasSprite.prototype.move = function (d, obstacle_sprites) {
    this.direction = d

    switch (d) {
      case DIRECTION.UP:
        if ((obstacle_sprites && !this.checkRangeOverlap(obstacle_sprites)) || !obstacle_sprites) {
          this.y -= this.speed

          if (this.y <= 5) {
            if (!this.out_of_border_die) {
              this.y = 0
            } else {
              // this.alive = 0;
              this.explode()
              document.getElementById('steelhit').play()
            }
          }
        }
        break
      case DIRECTION.DOWN:
        if ((obstacle_sprites && !this.checkRangeOverlap(obstacle_sprites)) || !obstacle_sprites) {
          this.y += this.speed

          if (this.y + this.height >= this.border_y - 10) {
            if (!this.out_of_border_die) {
              this.y = this.border_y - this.height
            } else {
              // this.alive = 0;
              this.explode()
              document.getElementById('steelhit').play()
            }
          }
        }
        break
      case DIRECTION.LEFT:
        if ((obstacle_sprites && !this.checkRangeOverlap(obstacle_sprites)) || !obstacle_sprites) {
          this.x -= this.speed

          if (this.x <= 5) {
            if (!this.out_of_border_die) {
              this.x = 0
            } else {
              // this.alive = 0;
              this.explode()
              document.getElementById('steelhit').play()
            }
          }
        }
        break
      case DIRECTION.RIGHT:
        if ((obstacle_sprites && !this.checkRangeOverlap(obstacle_sprites)) || !obstacle_sprites) {
          this.x += this.speed
          if (this.x + this.width >= this.border_x - 10) {
            if (!this.out_of_border_die) {
              this.x = this.border_x - this.width
            } else {
              // this.alive = 0;
              this.explode()
              document.getElementById('steelhit').play()
            }
          }
        }
        break
    }
  }
坦克发射子弹的逻辑
首先需要定义子弹的配置信息以及构造函数;
let MissileConfig = function (cfg) {
  this.x = cfg.x
  this.y = cfg.y
  this.type = cfg.type || MISSILE_TYPE.NORMAL
  this.width = cfg.width || this.type.dimension[0]
  this.height = cfg.height || this.type.dimension[1]
  this.direction = cfg.direction || DIRECTION.UP
  this.is_from_player = cfg.is_from_player
  this.out_of_border_die = cfg.out_of_border_die || 1 // 判断边界类型
  this.border_x = cfg.border_x || 0
  this.border_y = cfg.border_y || 0
  this.speed = cfg.speed || TANK_SPEED
  this.alive = cfg.alive || 1
}

    var Missile = function (MissileConfig) {
      var x = MissileConfig.x
      var y = MissileConfig.y
      var width = MissileConfig.width
      var height = MissileConfig.width
      var direction = MissileConfig.direction
      this.type = MissileConfig.type
      this.is_from_player = MissileConfig.is_from_player || 0
      var explosion_count = 0

      CanvasSprite.apply(this, [
        {
          alive: 1,
          out_of_border_die: 1,
          border_y: HEIGHT,
          border_x: WIDTH,
          speed: MISSILE_SPEED,
          direction: direction,
          x: x,
          y: y,
          width: width,
          height: height,
        },
      ])

      this.isDestroied = function () {
        return explosion_count > 0
      }

      this.explode = function () {
        if (explosion_count++ === 5) {
          this.alive = 0
        }
      }

      this.getImg = function () {
        if (explosion_count > 0) {
          return {
            width: TANK_EXPLOSION_FRAME[explosion_count].dimension[0],
            height: TANK_EXPLOSION_FRAME[explosion_count].dimension[1],
            offset_x: TANK_EXPLOSION_FRAME[explosion_count].image_coordinates[0],
            offset_y: TANK_EXPLOSION_FRAME[explosion_count].image_coordinates[1],
          }
        } else {
          return {
            width: width,
            height: height,
            offset_x: this.type.image_coordinates[0],
            offset_y: this.type.image_coordinates[1],
          }
        }
      }

      this.getHeadCoordinates = function () {
        var h_x, h_y

        switch (this.direction) {
          case DIRECTION.UP:
            h_x = this.x + this.width / 2 - this.type.dimension[0] / 2
            h_y = this.y - this.type.dimension[1] / 2
            break
          case DIRECTION.DOWN:
            h_x = this.x + this.width / 2 - this.type.dimension[0] / 2
            h_y = this.y + this.height - this.type.dimension[1] / 2
            break
          case DIRECTION.LEFT:
            h_x = this.x
            h_y = this.y + this.width / 2 - this.type.dimension[0] / 2
            break
          case DIRECTION.RIGHT:
            h_x = this.x + this.height
            h_y = this.y + this.width / 2 - this.type.dimension[0] / 2
        }
        console.log({
          x: h_x,
          y: h_y,
        })

        return {
          x: h_x,
          y: h_y,
        }
      }

      this._generateId = function () {
        return uuidv4()
      }
      sprites[this._generateId()] = this
    }
然后再定义一个 fire 开发函数,当开火后,会使用 window.requestAnimationFrame() 来达到循环的效果,每次重绘最新的位置信息
  this.fire = function (boolean_type) {
    if (!this.missle || !this.missle.alive) {
      var coor = this.getCannonCoordinates()
      this.missle = new Missile(
        new MissileConfig({
          x: coor.x,
          y: coor.y,
          direction: this.direction,
          type: this.miss_type,
          is_from_player: boolean_type,
        })
      )

      if (boolean_type) {
        document.getElementById('shoot').play()
      }
    }
  }
总结
利用 requestAnimationFrame 来实现循环刷新画布,通过修改各元素位置坐标值,在下一次画布重绘时更新视图,这是阶段交互的基本逻辑;
- End -
近期课程上新:
Vue基础 | 小程序开发 | JQuery入门 | PC端页面布局 | Typescript | JS基础运算符 | 数据类型之间存储区别 | 服务端渲染与客户端渲染 | Socket编程

文章评论