
整个项目在 https://github.com/ximikang/ffmpegThumbnail 发布
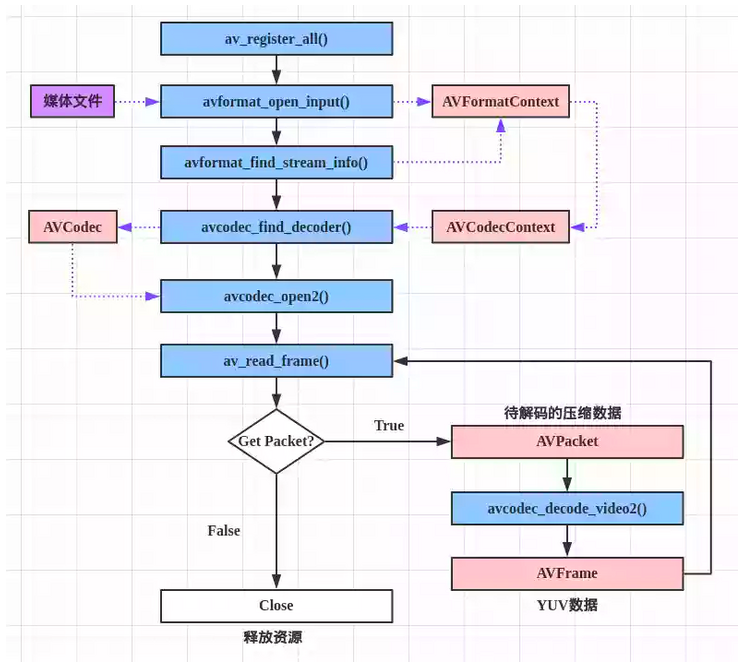
生成缩略图的步骤
-
使用ffmpeg解码视频
-
帧格式转换
-
根据缩略图的数量从视频流中取帧
-
使用opencv建立画布并生成缩略图
ffmpeg解码视频
根据缩略图的数量从视频流中取帧
-
获取图片之间的时间间隔
// Read media file and read the header information from container format
    AVFormatContext* pFormatContext = avformat_alloc_context();
    if (!pFormatContext) {
        logging("ERROR could not allocate memory for format context");
        return -1;
    }

    if (avformat_open_input(&pFormatContext, inputFilePath.string().c_str(), NULL, NULL) != 0) {
        logging("ERROR could not open media file");
    }

    logging("format %s, duration %lld us, bit_rate %lld", pFormatContext->iformat->name, pFormatContext->duration, pFormatContext->bit_rate);
    cout << "视频时常:" << pFormatContext->duration / 1000.0 / 1000.0 << "s" << endl;
    int64_t video_duration = pFormatContext->duration;
    int sum_count = rowNums * colNums;
    //跳转的间隔 ms
int64_t time_step = video_duration / sum_count / 1000;-
设置跳转时间获取不同的视频Packet
for (int i = 0; i < sum_count ; ++i) {
        cv::Mat tempImage;
        // 每次读取相同时间间隔的图像并存入vImage中
        while (av_read_frame(pFormatContext, pPacket) >= 0) {
            if (pPacket->stream_index == video_stream_index) {
                response = decode_packet_2mat(pPacket, pCodecContext, pFrame, tempImage);// 返回
            }
            if (response == 0)// 成功读取一帧
                break;
            if (response < 0)
                continue;
        }
        vImage.push_back(tempImage);
        // 跳转视频
        av_seek_frame(pFormatContext, -1, ((double)time_step / (double)1000)* AV_TIME_BASE*(double)(i+1) + (double)pFormatContext->start_time, AVSEEK_FLAG_BACKWARD);
    }
3.获取Frame
在固定的时间点可能无法获取从当前时间点的Packet获取对应的Frame,所以需要对获取的Packet进行判断,如果没有获取到对应的Frame应该继续获取下一Packet直到获取到对应的Frame为止。
static int decode_packet_2mat(AVPacket* pPacket, AVCodecContext* pCodecContext, AVFrame* pFrame, cv::Mat& image) {
    int response = avcodec_send_packet(pCodecContext, pPacket);

    if (response < 0) {
        logging("Error while sending a packet to the decoder");
        return response;
    }

    while (response >= 0) {
        // return decoded out data from a decoder
        response = avcodec_receive_frame(pCodecContext, pFrame);
        if (response == AVERROR(EAGAIN) || response == AVERROR_EOF) {
            logging("averror averror_eof");
            break;
        }
        else if (response < 0) {
            logging("Error while receiving frame");
            return response;
        }

        if (response >= 0) {
            // 获取到Frame
            image = frame2Mat(pFrame, pCodecContext->pix_fmt);
        }
        return 0;
    }
}
帧格式转换
由于从视频流获取的帧是YUV格式的Frame格式,后面使用opencv进行操作所以进行格式转换。
先使用ffmpeg中的SwsContext将从视频中抽取到的帧从YUV转换到BGR格式,再从BGRFrame中的内存中获取原始数据,并转换到opencv的Mat类型。
cv::Mat frame2Mat(AVFrame* pFrame, AVPixelFormat pPixFormat)
{
    // image init
    AVFrame* pRGBFrame = av_frame_alloc();
    uint8_t* out_buffer = new uint8_t[avpicture_get_size(AV_PIX_FMT_BGR24, pFrame->width, pFrame->height)];
    avpicture_fill((AVPicture*)pRGBFrame, out_buffer, AV_PIX_FMT_BGR24, pFrame->width, pFrame->height);
    SwsContext* rgbSwsContext = sws_getContext(pFrame->width, pFrame->height, pPixFormat, pFrame->width, pFrame->height, AV_PIX_FMT_BGR24,SWS_BICUBIC, NULL, NULL, NULL);
    if (!rgbSwsContext) {
        logging("Error could not create frame to rgbframe sws context");
        exit(-1);
    }
    if (sws_scale(rgbSwsContext, pFrame->data, pFrame->linesize, 0, pFrame->height, pRGBFrame->data, pRGBFrame->linesize) < 0) {
        logging("Error could not sws to rgb frame");
        exit(-1);
    }

    cv::Mat mRGB(cv::Size(pFrame->width, pFrame->height), CV_8UC3);
    mRGB.data = (uchar*)pRGBFrame->data[0];//注意不能写为:(uchar*)pFrameBGR->data

    av_free(pRGBFrame);
    sws_freeContext(rgbSwsContext);
    return mRGB;
}
使用opencv建立画布并生成缩略图
通过画布需要的大小参数,画出白色画布,再对画布进行填充。
cv::Mat makeThumbnail(vector<cv::Mat> vImage, const unsigned int rowNums, const unsigned int colNums)
{
// 判断图片时候满足条件
if (vImage.size() != rowNums * colNums) {
logging("Error image size not equal input size");
logging("vImage length: %d, rowNums: %d, col number: %d", vImage.size(), rowNums, colNums);
exit(-1);
}
int interval = 100;
int height = vImage[0].size().height * rowNums + interval * (rowNums + 1);
int width = vImage[0].size().width * colNums + interval * (colNums + 1);
logging("thumbnail size: %d * %d", height, width);
cv::Mat thumbnail(cv::Size(width, height), CV_8UC3);
thumbnail.setTo(255);
// 进行填充
for (int i = 0; i < rowNums; ++i) {
for (int j = 0; j < colNums; ++j) {
int no = i * rowNums + j;
int widthOffset = (vImage[0].size().width + interval) * j + interval;
int heightOffset = (vImage[0].size().height + interval) * i + interval;
vImage[no].copyTo(thumbnail(cv::Rect(widthOffset, heightOffset, vImage[0].size().width, vImage[0].size().height)));
}
}
return thumbnail;
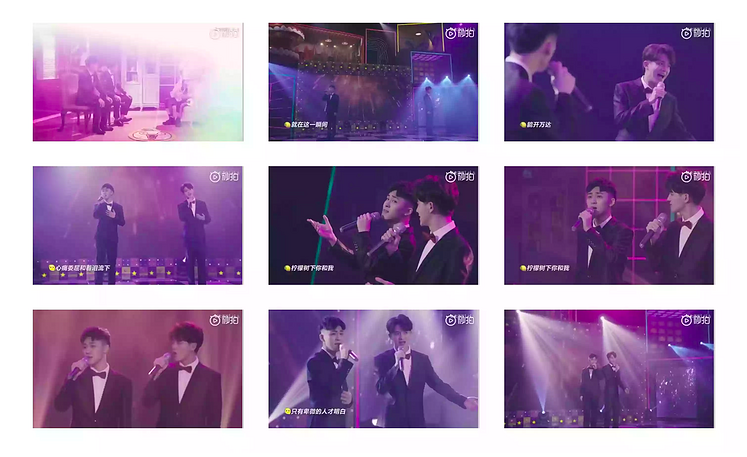
}最后的效果
来源:
https://segmentfault.com/a/1190000039409543
“IT大咖说”欢迎广大技术人员投稿,投稿邮箱:[email protected]

IT大咖说 | 关于版权
由“IT大咖说(ID:itdakashuo)”原创的文章,转载时请注明作者、出处及微信公众号。投稿、约稿、转载请加微信:ITDKS10(备注:投稿),茉莉小姐姐会及时与您联系!
感谢您对IT大咖说的热心支持!
相关推荐
推荐文章

文章评论