
/ 今日科技快讯 /
近日,华为在开发者大会发布了鸿蒙OS 2.0系统,并对生态进行了完整链条的赋能。据报道,华为消费者BG软件开发副总裁杨海松在受访时表示,华为的小目标是,一年内做到1亿搭载鸿蒙系统的华为设备和1亿搭载鸿蒙系统的三方设备。另据了解,除了手机、手表、车机等平台之外,鸿蒙2.0系统还会开源开放,其他厂商也可以加入鸿蒙大家庭中,家电行业已经有美的、九阳和老板电器三家品牌首批支持。
/ 作者简介 /
大家周一好,一场秋雨一场凉,注意降温防流感哦~
本篇文章来自啊森弟的投稿,和大家分享了Flutter开发中的UI渲染原理相关的内容,相信会对大家有所帮助!同时也感谢作者贡献的精彩文章!
啊森弟的博客地址:
https://blog.csdn.net/A_sendy
/ 前言 /
写Flutter已有好几个月的时间了,最开始总会有一点点不适应,但是写一段时间后还是觉得蛮顺手的,而且支持热部署,不需要等整个项目编译,提升了不少效率。但是在开发过程中,总是会遇到因为Widget嵌套得不好而出现一些错误,于是一直想学习一下它的相关原理看看是为什么。所以通过学习和参考网上大神分享的的一些资料,整理出了今天要分享的文章。
/ 正文 /
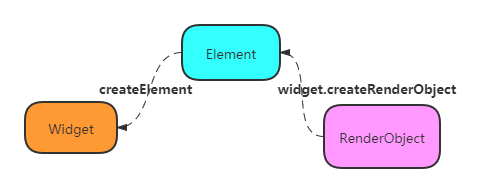
Flutter有三棵重要的树,分别是Widget树、Element树、RenderObject树,它们各司其职,分成了几个相关联但清晰的结构。Widget树与我们日常开发接触最多,其它的两棵树比较少接触到。
这三棵树的关联的大致流程:根据Widget生成Element,然后创建相应的RenderObject并关联到Element.renderObject属性上,再完成布局排列和绘制。最后合并层级,通过Skia引擎渲染为GPU数据,然后GPU接着将数据交给显示器显示。
它们三者的联系如下图:
如果最开始有人告诉你写Flutter就像在写配置,你会不会觉得不太可能。那么一起通过下面的内容看看这句话到底是不是真的。
WidgetWidget
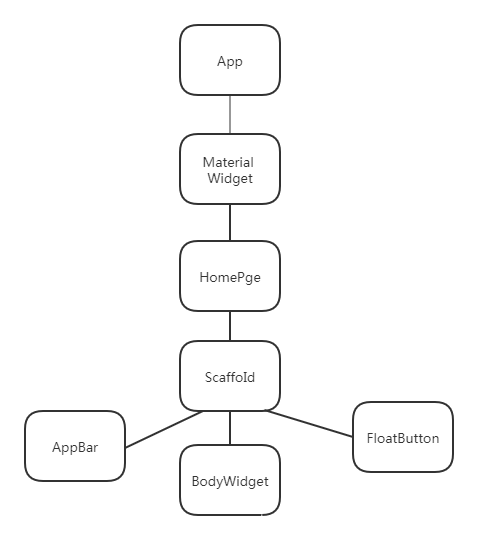
只是UI元素中的配置数据,并且一个Widget可以对应多个Element。真正的UI渲染树是由Element构成的。日常开发中,常见结构如下图:
重要成员
-
Key:跟Widget的runtimeType一起决定此Widget是否复用
-
createElement方法:创建对应的Element
-
canUpdate方法:对比runtimeType和Key,相等的话表示就会用新的Widget去更新Element,否则的话会重新创建Element对象。
static bool canUpdate(Widget oldWidget, Widget newWidget) {
  return oldWidget.runtimeType == newWidget.runtimeType
      && oldWidget.key == newWidget.key;
}
StatelessWidget
-
用于不需要维护状态的Widget
-
createElement方法返回的是StatelessElement对象
StatefulWdiget
-
createElement方法返回的是StatefulElement对象
-
createState方法返回一个State对象,维护状态信息
State
-
在第一次插入到树中被创建,它的widget成员可能会被更新,在mount的时候,会调用firstBuild方法,firstBuild方法会调用rebuild方法
-
调用setState方法后,会调用对应Element的markNeedsBuild:被标记为dirty,并且会调用owner.scheduleBuildFor(this),然后会触发rebuild。
Elementmount
方法中调用Widget去创建一个RenderObject,创建的RenderObject会被Element持有;然后插入到渲染树中。(RenderObjectElement等等),代码如下:
void mount(Element parent, dynamic newSlot) {
  super.mount(parent, newSlot);

  _renderObject = widget.createRenderObject(this);
    //省略
  attachRenderObject(newSlot);
  _dirty = false;
}
-
创建一个RenderObject
-
加入到渲染树
当配置改变,Widget会根据runtimeType和Key去比较,判断是否可复用Elemen,可复用的话,则更新Element的配置,否则新建一个(Widget中的canUpdate方法决定)。
rebuild方法会调用performRebuild方法:
void performRebuild() {

  Widget built;
  try {
      built = build();
  } catch (e, stack) {

  } finally {
    // We delay marking the element as clean until after calling build() so
    // that attempts to markNeedsBuild() during build() will be ignored.
    _dirty = false;
  }
  try {
    _child = updateChild(_child, built, slot);
  } catch (e, stack) {
    _child = updateChild(null, built, slot);
  }

}
build返回新的Widget。
updatechild通过新的配置,返回一个element。
-
child为null,newWidget不为null,需新建一个Element
-
child不为null、newWidget不为null,根据 新的Widget类型和对比新旧的Key是否一致来决定是否新建一个Element
-
child不为null,newWidget为null,移除掉Element
-
两者都为null,什么都不用做
移除
void deactivateChild(Element child) {
  child._parent = null;
  child.detachRenderObject();
  owner._inactiveElements.add(child); // this eventually calls child.deactivate()
}
创建/重新插入
重新插入的话会先移除,然后调用inflateWidget方法,如果key为GlobalKey的话,则会复用之前的Element,然后重新active、并且将其renderObject加入到渲染树中。
Element inflateWidget(Widget newWidget, dynamic newSlot) {
  final Key key = newWidget.key;
  if (key is GlobalKey) {
    final Element newChild = _retakeInactiveElement(key, newWidget);
    if (newChild != null) {
      newChild._activateWithParent(this, newSlot);
      final Element updatedChild = updateChild(newChild, newWidget, newSlot);
      return updatedChild;
    }
  }
  final Element newChild = newWidget.createElement();

  newChild.mount(this, newSlot);
  return newChild;
}
留意:BuildContext是Widget对应的Element。
RenderObject
RenderObject的主要职责是布局、绘制、合成。
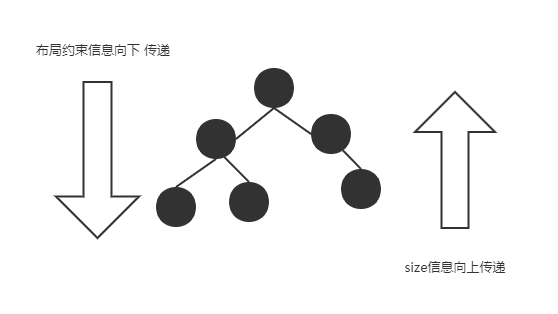
布局
父控件将布局约束传递给子控件。
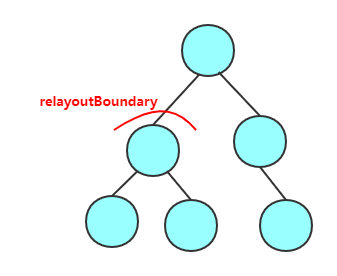
void layout(Constraints constraints, { bool parentUsesSize = false }) {
  RenderObject relayoutBoundary;
  if (!parentUsesSize || sizedByParent || constraints.isTight || parent is! RenderObject) {
    relayoutBoundary = this;
  } else {
    relayoutBoundary = (parent as RenderObject)._relayoutBoundary;
  }

_relayoutBoundary = relayoutBoundary;

  if (sizedByParent) {
    performResize();
  }

  try {
    performLayout();
  } catch (e, stack) { }
  _needsLayout = false;
  markNeedsPaint();
}
-
layout:参数有constraints和parentUsesSize,是否依靠父节点点父节点对子节点对限制。
-
确定relayoutBoundary,需要重新布局的区域。
-
parentData:子节点在父节点中的偏移等信息
-
performResize:如果是需要依靠父节点确定大小,则大小通过parent传递给它的constraints确定
-
performLayout:对自身、child进行布局
例如:RenderPadding的performLayout方法。
@override
void performLayout() {
  final BoxConstraints constraints = this.constraints;
  _resolve();
  if (child == null) {
    size = constraints.constrain(Size(
      _resolvedPadding.left + _resolvedPadding.right,
      _resolvedPadding.top + _resolvedPadding.bottom,
    ));
    return;
  }
  final BoxConstraints innerConstraints = constraints.deflate(_resolvedPadding);
    //子组件的layout
  child.layout(innerConstraints, parentUsesSize: true);
  final BoxParentData childParentData = child.parentData as BoxParentData;
    //设置子组件parentData的数据
  childParentData.offset = Offset(_resolvedPadding.left, _resolvedPadding.top);
  size = constraints.constrain(Size(
    _resolvedPadding.left + child.size.width + _resolvedPadding.right,
    _resolvedPadding.top + child.size.height + _resolvedPadding.bottom,
  ));
}
markNeedsLayout方法
会根据relayoutBoundary来确定需要布局到哪个节点(如果不是本身,那么就一直往上找)
void markNeedsLayout() {
  ...
  assert(_relayoutBoundary != null);
  if (_relayoutBoundary != this) {
    markParentNeedsLayout();
  } else {
    _needsLayout = true;
    if (owner != null) {
      ...
      owner._nodesNeedingLayout.add(this);
      owner.requestVisualUpdate();
    }
  }
}
绘制
void paint(PaintingContext context, Offset offset) { }
有的RenderObject会先判断是否溢出,如果溢出则绘制溢出的提示。正常的话会走绘制流程;绘制child的话,会根据child的parentData来计算绘制位置。然后进行绘制(例如RenderView)
void paint(PaintingContext context, Offset offset) {
    if (child != null)
      context.paintChild(child, offset);
  }

void paintChild(RenderObject child, Offset offset) {
  if (child.isRepaintBoundary) {
    stopRecordingIfNeeded();
    _compositeChild(child, offset);
  } else {
    child._paintWithContext(this, offset);
  }
}

void _compositeChild(RenderObject child, Offset offset) {
  if (child._needsPaint) {
    repaintCompositedChild(child, debugAlsoPaintedParent: true);
  } else {
  }
  child._layer.offset = offset;
  appendLayer(child._layer);
}
-
_compositeChild:创建Layer、并在layer上绘制,然后合成
-
_paintWithContext:在父控件上绘制
-
如果是独立绘制,那么会创建一个层,将组件在该层上面绘制。
isRepaintBoundary:确定是否独立于父元素绘制。如果一个RenderObject绘制频繁时,可以通过制定为true,来提高性能。以下代码体现了它的作用:
void markNeedsPaint() {
  if (_needsPaint)
    return;
  _needsPaint = true;
  if (isRepaintBoundary) {

    // If we always have our own layer, then we can just repaint
    // ourselves without involving any other nodes.
    if (owner != null) {
      owner._nodesNeedingPaint.add(this);
      owner.requestVisualUpdate();
    }
  } else if (parent is RenderObject) {
    final RenderObject parent = this.parent as RenderObject;
    parent.markNeedsPaint();
  } else {

    // If we're the root of the render tree (probably a RenderView),
    // then we have to paint ourselves, since nobody else can paint
    // us. We don't add ourselves to _nodesNeedingPaint in this
    // case, because the root is always told to paint regardless.
    if (owner != null)
      owner.requestVisualUpdate();
  }
}
markNeedsPaint方法:一直向上父节点查找,直到找到一个isRepaintBoundary为true的RenderObject,才会开始重绘。如果找到了根节点,则直接绘制。

requestVisualUpdate方法最后会调用到window的scheduleFrame(刷新UI)。
/ 总结 /
本文主要分享了Flutter中Widget、Element和RenderObject之间的联系,并且分析了布局与绘制的相关原理。当然Flutter的渲染原理远不止这些,以上只是分析在Framework层面的,下面还有引擎的其他操作。希望通过此文对你有帮助,以上分享如果有什么不妥还望指出纠正。
推荐阅读:
欢迎关注我的公众号
学习技术或投稿


长按上图,识别图中二维码即可关注

文章评论