
作者丨javin paul
译者丨王文刚
Spring Security 是通过声明方式在 Java Web 应用程序中实现安全性的流行开源框架之一。它提供了基本的安全功能,如 LDAP 身份验证,授权,基于角色的访问控制,记住密码,URL 保护,并发活动 Session 管理等。为了在 Java Web 应用程序中启用 Spring Security,需要配置如下三项内容 :
-
在web.xml中声明委托代理过滤器(delegating proxy filter )
-
在web.xml中添加ContextLoaderListener
-
在applicationContext-Security.xml文件上提供实际的安全性约束。
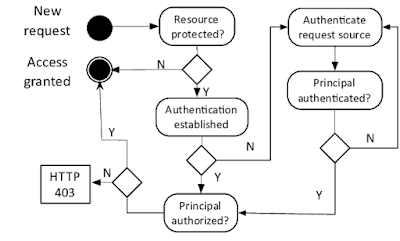
由于 Spring Security 使用一系列过滤器来实现各种安全约束,也称为 Spring 的“安全链过滤器”,它依赖于通过 Java Web 容器来初始化过滤器的代理。
如果你还记得,过滤器是由像 Tomcat 或 Jetty 这样的 Servlet 容器创建、维护和销毁。通过在 web.xml 中声明过滤器,并且 Web 容器通过调用过滤器的 init(FilterConfig config)方法来进行初始化。然后,此过滤器将预处理和后处理任务委托给 Spring Security 框架的过滤器实现。
每当请求或响应通过匹配过滤器的 URL 模式,Servlet 容器就会调用 DelegatingFilterProxy 的 doFilter()方法来进行处理。
此方法可以访问 ServletRequest,ServletResponse 和 FilterChain 对象,这意味着它可以在将请求发送到 Servlet 或响应客户端之前修改请求标头,响应标头和响应正文。FilterChain 对象用于将请求路由中转到过滤链中的另一个过滤器进一步处理。
顺便说一下,在深入 Spring Security 之前了解 Spring 框架很重要,如果你觉得自己对 Spring 框架知之甚少,那么我建议你先学习一下像 Spring Framework 5 这样的综合课程:初学者到 Guru 。
在 Web 应用程序中启用 Spring Security 的步骤。
以下是在 Java Web 应用程序中启用 Spring Security 功能的三个步骤:
-
首先在 web.xml 中声明 DelegatingFilterProxy 过滤器;
-
接着,将 Spring 应用程序上下文文件指定给 ContextLoaderListener;
-
最后,在 applicationContext-Security.xml 文件中指定 Spring Security 模板匹配 URL。
在 web.xml 中使用 DelegatingFilterProxy 过滤器声明如下:
<filter><filter-name>springSecurityFilterChain</filter-name> <filter-class>org.springframework.web.filter.DelegatingFilterProxy</filter-class></filter><filter-mapping><filter-name>springSecurityFilterChain</filter-name><url-pattern>/*</url-pattern></filter-mapping>{1}{1}
Servlet 容器将获取此过滤器并进行初始化,并在发出请求时调用 DelegatingSpringSecurity 的 doFilter()方法。通过调用 init()方法初始化过滤器。DelegatingFilterProxy 扩展了 GenricFilterBean,它实现了 init(FilterConfig filterConfig)方法,并回调 initFilterBean()以允许子类执行初始化。
默认情况下,DelegatingFilterProxy 类将在初始化期间查找 Spring 应用程序上下文 ,如下面 Spring 安全 JAR 文件中 DelegatingFilterProxy 类的代码所示。
protected void initFilterBean() throws ServletException {synchronized (this.delegateMonitor){ if (this.delegate == null) { // If no target bean name specified, use filter name.if (this.targetBeanName == null){this.targetBeanName = getFilterName(); } // Fetch Spring root application context and initialize the// delegate early, if possible.// If the root application context will be started// after this filter proxy, we'll have to resort to lazy// initialization.WebApplicationContext wac = findWebApplicationContext();if (wac != null){ this.delegate = initDelegate(wac); } }}}
如果要自定义此行为,可以通过 FilterConfig 对象使用 targetBeanName 提供 bean 类的名称。如果没有,那么这将使用 filter-name,即“springSecurityFilterChain”。然后,它在 applicationContext.xml 和 applicationContext-Security.xml 文件中搜索此 bean 以进行初始化。
但是,当您在配置文件中搜索此内容时,很可能由于而无法找到它,因为使用默认值会隐藏了复杂性。您可以进一步加入学习 Spring Security 4 基础实践,以了解有关如何在 Spring 安全性中委派过滤器代理以及如何自定义和配置其行为的更多信息。
以下是在 Java Web 应用程序中加载 Spring 安全性配置文件的方法:
<listener><listener-class> org.springframework.web.context.ContextLoaderListener</listener-class></listener><context-param><param-name>contextConfigLocation</param-name><param-value>/WEB-INF/applicationContext.xml/WEB-INF/applicationContext-security.xml</param-value></context-param>
应该把配置文件 applicationContext-security.xml 放在 WEB-INF 目录中。
以下是 Spring 安全配置文件的示例:
<beans xmlns="http://www.springframework.org/schema/beans" xmlns:security="http://www.springframework.org/schema/security" xmlns:xsi="http://www.w3.org/2001/XMLSchema-instance" xsi:schemaLocation="http://www.springframework.org/schema/beans http://www.springframework.org/schema/beans/spring-beans-3.0.xsd http://www.springframework.org/schema/security http://www.springframework.org/schema/security/spring-security-3.1.xsd"><security:http auto-config="true"><security:intercept-url pattern="/admin" access="ROLE_ADMIN" /> </security:http><security:authentication-manager><security:authentication-provider><security:user-service><security:user authorities="ROLE_ADMIN" name="admin" password="admin" /><security:user authorities="ROLE_ADMIN" name="root" password="root" /> </security:user-service></security:authentication-provider></security:authentication-manager></beans>
通过这种简单的配置,现在可以保护所有以 /admin 结尾的 URL 只能使用用户名和密码进行访问。有权访问此权限的两个用户 admin 和 root。简而言之,您不需要对任何 Spring 安全过滤器或 bean 进行编码,所有这些都是通过使用现有的 Spring 安全过滤器和标记来完成的。
顺便说一句,如果你想深入理解这个配置,比如每个标签的含义以及它们与 Java 类的关系,我建议你看看 Eugen 的 Spring Security Master 课,它针对 Spring Security 5 进行了更新。
现在,如果您点击 URL 登录 admin,将要求您输入用户名和密码,并且只有在正确的凭据之后才允许您访问受保护的部分。
在模式的顺序声明此非常重要,它们必须按最具体到最不具体的顺序声明,因为这些模式按照它们在 spring 安全应用程序上下文文件中声明的顺序进行计算 找到匹配项,不执行其他模式。
这就是如何在 Java Web 应用程序中启用或激活 Spring Security。虽然配置和使用非常简单,但功能非常强大,为您提供了许多实现复杂安全约束的可选项。我们没有编写任何代码,我们只是进行了一些 XML 配置,以便将不安全的 Web 应用程序设置为安全的,很神奇。
原文链接:
https://javarevisited.blogspot.com/2017/05/how-to-enable-spring-security-in-java-web-application.html
点个在看少个 bug ?

文章评论