前面给大家分析过 ReactNative For Android (RN4A) 的通信机制,这次我们从源码出发,分析下RN4A的启动过程。启动过程基于通信机制,涉及通信机制原理大家可以查看前一篇文章,本篇不赘述。

上面是2016 React.js Conf FB 工程师分享的RN启动时序图,整个过程比较清晰,先启动终端运行时,随后由终端上下文去启动JS的运行时,进而布局,最后再由终端进行渲染,最后将View添加到RootView上。那接下来,我们先理解几个概念,方便后续我们对整个启动过程的理解。
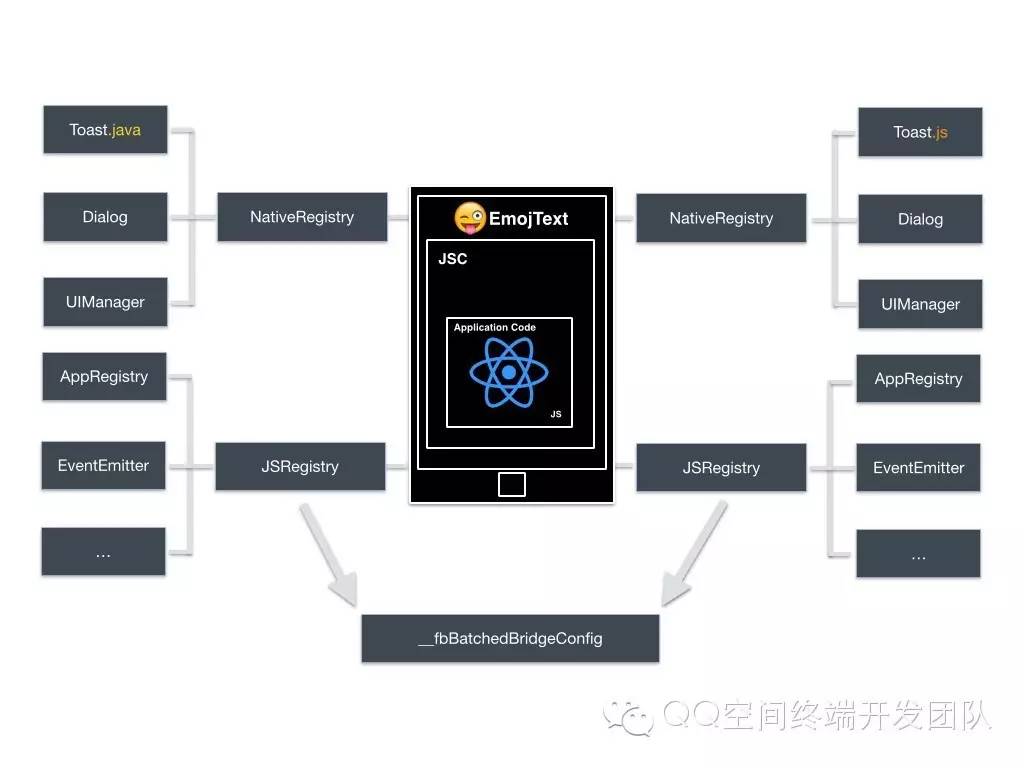
模块:
模块即暴露给调用方的API集合,在RN4A存在两种模块。
一种是Native层暴露给Js层的API集合模块,即NativeModule,如ToastModule,DialogModule,或是创建View的UIManagerModule。业务方可以通过实现NativeModule自定义模块,通过重写getName将模块名暴露给Js层,通过注解的方式将API暴露给Js层调用。
另一种是Js层暴露给Java层的API集合模块,即JavascriptModule,如DeviceEventEmitter,AppRegistry等。业务方可以通过继承JavaScriptModule接口自定义接口模块,申明与Js层相应的方法即可。
无论是NativeModule还是JavascriptModule,在Js层存在与之相互映射同名的Module,Js层通过require引用Module。
模块注册表:
各模块信息统一收集到模块注册表。同样,在RN4A中存在两种模块注册表,一是由集合所有Java层模块接口信息的NativeModuleRegistry,另一种是集合所有Js层模块接口信息的JavascriptModuleRegistry。在启动RN4A后,终端将注册表信息存入与前端互通的全局变量 __fbBatchedBridgeConfig 中,使得Js层与Java层存在同样的模块注册表。
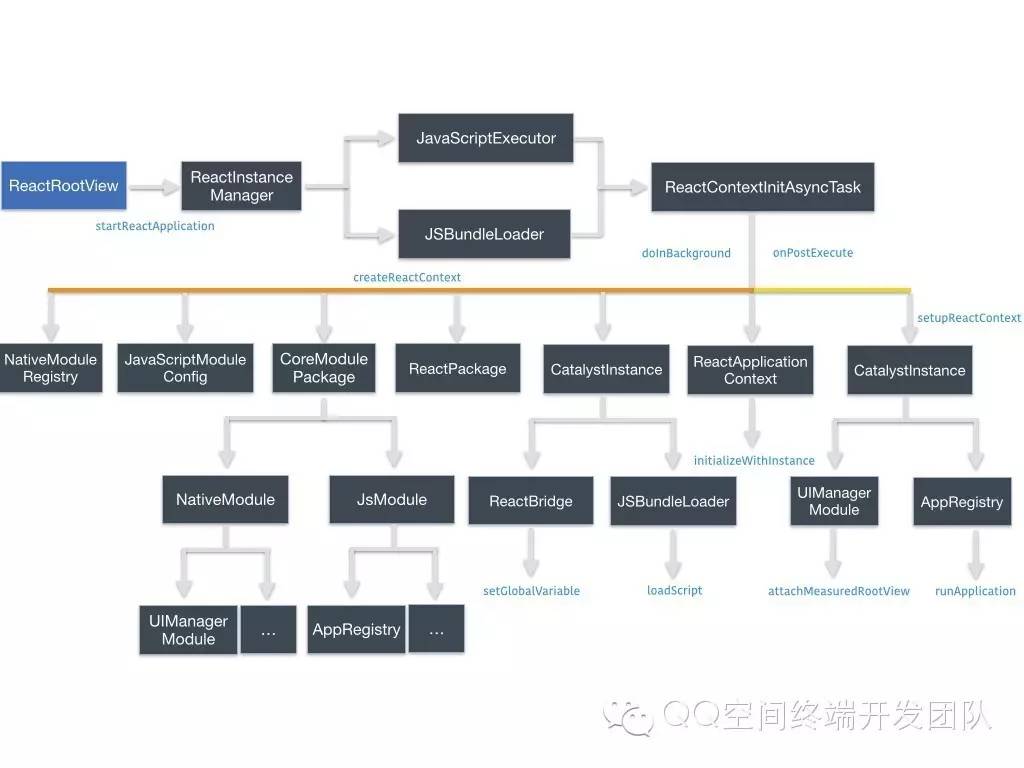
正如上面FB攻城狮提出的时序图,从终端启动,入口是ReactRootView.startReactApplication,在构造JavaScriptExecutor&JSBundleLoader后,进而通过ReactContextInitAsycnTask去创建ReactContext,这部分主要创建了NativeModules,JavaScriptModule及其对的注册表,负责Js与Java通信的高层接口CatalystInstance等。在创建完ReactContext后,通过CatalystInstance获取AppRegistry并调用其runApplication启动Js Application。整体流程如下:
接下来进入正题,从源码来分析RN4A的启动(为阅读方便,源码适当裁剪)
ReactInstanceManager createReactContextInBackground,通过AysncTask初始化ReactNative上下文。mJSModuleName是与前端约定好所要启动的JS Application Name。mLauncahOptions是终端启动前端Application可选的传入的参数。
/**
 * ReactRootView.java
 */
public void startReactApplication(
    ReactInstanceManager reactInstanceManager,
    String moduleName,
    @Nullable Bundle launchOptions) {
  UiThreadUtil.assertOnUiThread();

  mReactInstanceManager = reactInstanceManager;
  mJSModuleName = moduleName;
  mLaunchOptions = launchOptions;

  if (!mReactInstanceManager.hasStartedCreatingInitialContext()) {
    mReactInstanceManager.createReactContextInBackground();
  }

  if (mWasMeasured && mIsAttachedToWindow) {
    mReactInstanceManager.attachMeasuredRootView(this);
    mIsAttachedToInstance = true;
    getViewTreeObserver().addOnGlobalLayoutListener(getKeyboardListener());
  } else {
    mAttachScheduled = true;
  }
}
createReactContextInBackground最终调用到recreateReactContextInBackgroundFromBundleFile。这里会创建两个Key Obj : JSCJavaScriptExecutor&JSBundleLoader。
JSCJavaScriptExecutor继承自JavaScriptExecutor,在JSCJavaScriptExecutor.class加载会加载ReactNative的SO,并且,在初始JSCJavaScriptExecutor时会调用initialze去初始C++层ReactNative与JSC的通信框架等。
JSBundleLoader缓存了JsBundle的信息,封装了上层加载JsBundle相关接口,CatalystInstance通过其间接调用ReactBridge去加载文件。
/**
 * ReactInstanceManagerImpl.java
 */
private void recreateReactContextInBackgroundFromBundleFile() {
  recreateReactContextInBackground(
      new JSCJavaScriptExecutor.Factory(),
      JSBundleLoader.createFileLoader(mApplicationContext, mJSBundleFile));
}
创建完JSCJavaScriptExecutor&JSBundleLoader后,execute ReactContextInitAsyncTask继续初始化ReactContext。
/**
 * ReactInstanceManagerImpl.java
 */
private void recreateReactContextInBackground(
    JavaScriptExecutor.Factory jsExecutorFactory,
    JSBundleLoader jsBundleLoader) {

  ReactContextInitParams initParams =
      new ReactContextInitParams(jsExecutorFactory, jsBundleLoader);
  if (!mIsContextInitAsyncTaskRunning) {

    ReactContextInitAsyncTask initTask = new ReactContextInitAsyncTask();
    initTask.execute(initParams);
    mIsContextInitAsyncTaskRunning = true;
  } else {
    mPendingReactContextInitParams = initParams;
  }
}
ReactContextInitAsyncTask为创建ReactContext的核心类,在执行初始化前会销毁先前的上下文,保证只存在一个上下文。随后,调用createReactContext进一步创建ReactContext。在创建完React Context后会调用setUpReactContext,进而通知DevSupportManager更新上下文,更新生命周期,将ReactRootView做为Root View传递给UIManagerModule,调用AppRegistry的runApplication去启动Js Application等。
/**
* ReactInstanceManagerImpl$ReactContextInitAsynTask.java
*/private final class ReactContextInitAsyncTask extends
AsyncTask<ReactContextInitParams, Void, Result<ReactApplicationContext>> {
@Override
protected void onPreExecute() {
if (mCurrentReactContext != null) {
tearDownReactContext(mCurrentReactContext);
mCurrentReactContext = null;
}
}@Override
protected Result<ReactApplicationContext> doInBackground(ReactContextInitParams... params) {
Assertions.assertCondition(params != null && params.length > 0 && params[0] != null);
try {
JavaScriptExecutor jsExecutor = params[0].getJsExecutorFactory().create();
return Result.of(createReactContext(jsExecutor, params[0].getJsBundleLoader()));
} catch (Exception e) {
// Pass exception to onPostExecute() so it can be handled on the main thread
return Result.of(e);
}
}@Override
protected void onPostExecute(Result<ReactApplicationContext> result) {
try {
setupReactContext(result.get());
} catch (Exception e) {
mDevSupportManager.handleException(e);
} finally {
mIsContextInitAsyncTaskRunning = false;
}// Handle enqueued request to re-initialize react context.
if (mPendingReactContextInitParams != null) {
recreateReactContextInBackground(
mPendingReactContextInitParams.getJsExecutorFactory(),
mPendingReactContextInitParams.getJsBundleLoader());
mPendingReactContextInitParams = null;
}
}
}在CreateReactContext中,主要有以下5个key path:
1.通过Builder构建上文概念讲过的NativeModuleRegistry及JavaScriptModuleConfig;
2.创建ReactApplicationContext。ReactApplicationContext继承自ContextWrapper,主要缓存了Application Context,Activity Context,ReactNative处理消息的三个thread(下篇讲述),还有就是全局控制JS调用导致Native Module Crash的NativeModuleCallExceptionHandler,在初始化ReactInstanceManager的时候传入,并且要关闭DeveloperSupport后才可以启用,假如不传,则默认交由DevSupportManger去处理;
3.创建ReactPackage。ReactPackage主要通过createNativeModules、createJSModules和createViewManagers等API去创建本地模块,JS模块及视图组件等。ReactPackage分为framework的CoreModulesPackage和业务方可选的基础MainReactPackage,CoreModulesPackage封装了大部分通信,调试核心类,如UIManagerModule,这个负责控制Js层Dom到Native View的核心类;
4.创建CatalystInstance。CatalystInstance并不直接面向开发者,开发者通ReactInstanceManger间接操作CatalystInstance。CatalystInstance持有对ReactBridge的引用,主要通过ReactBridge这个JNI类去实现Java层与Js层的通信,ReactBridge由CatalystInstance的Constructor创建。同时初始化的时候调用了ReactQueueConfigurationSpec.createDefault创建了ReactNative通信的两个线程 JsQueueThread&NativeModulesQueueThread;
5.调用reactContext.initializeWithInstance进一步将创建完的CatalystInstance及线程等缓存在ReactContext中;
6.调用catalystInstance.runJSBundle加载解析Jsbundle;
/**
* ReactInstanceManagerImpl.java
*
* @return instance of {@link ReactContext} configured a {@link CatalystInstance} set
*/
private ReactApplicationContext createReactContext(
JavaScriptExecutor jsExecutor,
JSBundleLoader jsBundleLoader) {
mSourceUrl = jsBundleLoader.getSourceUrl();
NativeModuleRegistry.Builder nativeRegistryBuilder = new NativeModuleRegistry.Builder();
JavaScriptModulesConfig.Builder jsModulesBuilder = new JavaScriptModulesConfig.Builder();
ReactApplicationContext reactContext = new ReactApplicationContext(mApplicationContext);
if (mUseDeveloperSupport) {
reactContext.setNativeModuleCallExceptionHandler(mDevSupportManager);
}
CoreModulesPackage coreModulesPackage =
new CoreModulesPackage(this, mBackBtnHandler, mUIImplementationProvider);
processPackage(coreModulesPackage, reactContext, nativeRegistryBuilder, jsModulesBuilder);
for (ReactPackage reactPackage : mPackages) {
processPackage(reactPackage, reactContext, nativeRegistryBuilder, jsModulesBuilder);
}
nativeModuleRegistry = nativeRegistryBuilder.build();
javaScriptModulesConfig = jsModulesBuilder.build();
NativeModuleCallExceptionHandler exceptionHandler = mNativeModuleCallExceptionHandler != null
? mNativeModuleCallExceptionHandler
: mDevSupportManager;
CatalystInstanceImpl.Builder catalystInstanceBuilder = new CatalystInstanceImpl.Builder()
.setReactQueueConfigurationSpec(ReactQueueConfigurationSpec.createDefault())
.setJSExecutor(jsExecutor)
.setRegistry(nativeModuleRegistry)
.setJSModulesConfig(javaScriptModulesConfig)
.setJSBundleLoader(jsBundleLoader)
.setNativeModuleCallExceptionHandler(exceptionHandler);
CatalystInstance catalystInstance= catalystInstanceBuilder.build();
if (mBridgeIdleDebugListener != null) {
catalystInstance.addBridgeIdleDebugListener(mBridgeIdleDebugListener);
}
reactContext.initializeWithInstance(catalystInstance);
catalystInstance.runJSBundle();
return reactContext;
}ReactBridge由CatalystInstance的Constructor创建。
/**
* CatalystInstanceImpl.java
*/
private CatalystInstanceImpl(
final ReactQueueConfigurationSpec ReactQueueConfigurationSpec,
final JavaScriptExecutor jsExecutor,
final NativeModuleRegistry registry,
final JavaScriptModulesConfig jsModulesConfig,
final JSBundleLoader jsBundleLoader,
NativeModuleCallExceptionHandler nativeModuleCallExceptionHandler) {
mReactQueueConfiguration = ReactQueueConfigurationImpl.create(
ReactQueueConfigurationSpec,
new NativeExceptionHandler());
mBridgeIdleListeners = new CopyOnWriteArrayList<>();
mJavaRegistry = registry;
mJSModuleRegistry = new JavaScriptModuleRegistry(CatalystInstanceImpl.this, jsModulesConfig);
mJSBundleLoader = jsBundleLoader;
mNativeModuleCallExceptionHandler = nativeModuleCallExceptionHandler;
mTraceListener = new JSProfilerTraceListener();
try {
mBridge = mReactQueueConfiguration.getJSQueueThread().callOnQueue(
new Callable<ReactBridge>() {
@Override
public ReactBridge call() throws Exception {
Systrace.beginSection(Systrace.TRACE_TAG_REACT_JAVA_BRIDGE, "initializeBridge");
try {
return initializeBridge(jsExecutor, jsModulesConfig);
} finally {
Systrace.endSection(Systrace.TRACE_TAG_REACT_JAVA_BRIDGE);
}
}
}).get();
} catch (Exception t) {
throw new RuntimeException("Failed to initialize bridge", t);
}
}ReactBridge将注册表信息存入与前端互通的全局变量 __fbBatchedBridgeConfig 中,使得Js层与Java层存在同样的模块注册表。
/**
* CatalystInstanceImpl.java
*/
private ReactBridge initializeBridge(
JavaScriptExecutor jsExecutor,
JavaScriptModulesConfig jsModulesConfig) {
ReactBridge bridge = new ReactBridge(jsExecutor, new NativeModulesReactCallback(),
mReactQueueConfiguration.getNativeModulesQueueThread());
Systrace.beginSection(Systrace.TRACE_TAG_REACT_JAVA_BRIDGE, "setBatchedBridgeConfig");
bridge.setGlobalVariable(
"__fbBatchedBridgeConfig",
buildModulesConfigJSONProperty(mJavaRegistry, jsModulesConfig));
bridge.setGlobalVariable(
"__RCTProfileIsProfiling",
return bridge;
}调用catalystInstance.runJSBundle加载解析Jsbundle。假如在解析过程中出现Exception,统一交给NativeModuleCallExceptionHandler处理,建议开发者设置自己的NativeModuleCallExceptionHandler,可以归避部分Crash(SyntaxError: Unexpected token ‘<‘ 或 SyntaxError: Unexpected end of script)。
/**
* CatalystInstanceImpl.java
*/
public void runJSBundle() {
try {
mJSBundleHasLoaded = mReactQueueConfiguration.getJSQueueThread().callOnQueue(
new Callable<Boolean>() {
@Override
public Boolean call() throws Exception {
incrementPendingJSCalls();
try {
mJSBundleLoader.loadScript(mBridge);
Systrace.registerListener(mTraceListener);
} catch (JSExecutionException e) {
mNativeModuleCallExceptionHandler.handleException(e);
} finally {
Systrace.endSection(Systrace.TRACE_TAG_REACT_JAVA_BRIDGE);
}
return true;
}
}).get();
} catch (Exception t) {
throw new RuntimeException(t);
}
}在创建完React Context后会执行ReactContextInitAsyncTask的onPostExecute,从而调用setUpReactContext,会将ReactRootView做为Root View传递给UIManagerModule,此后Js通过UIManager创建的View都会add到该View上。
/**
* ReactInstanceManagerImpl.java
*/
@Override
public void attachMeasuredRootView(ReactRootView rootView) {
UiThreadUtil.assertOnUiThread();
if(mIsNeedDetachView){
Log.d(ReactConstants.QZONE_REACT_SRC_TAG,"attachMeasuredRootView do add");
mAttachedRootViews.add(rootView);
// If react context is being created in the background, JS application will be started
// automatically when creation completes, as root view is part of the attached root view list.
if (!mIsContextInitAsyncTaskRunning && mCurrentReactContext != null) {
attachMeasuredRootViewToInstance(rootView, mCurrentReactContext.getCatalystInstance());
}
}else{
Log.d(ReactConstants.QZONE_REACT_SRC_TAG,"attachMeasuredRootView do nothing");
}
}在绑定完RootView后,通过CatalystInstance获取AppRegistry这个JSModule后,进一步调用runApplication启动Js Application。
/**
* ReactInstanceManagerImpl.java
*/
private void attachMeasuredRootViewToInstance(
ReactRootView rootView,
CatalystInstance catalystInstance) {
rootView.removeAllViews();
rootView.setId(View.NO_ID);
UIManagerModule uiManagerModule = catalystInstance.getNativeModule(UIManagerModule.class);
int rootTag = uiManagerModule.addMeasuredRootView(rootView);
@Nullable Bundle launchOptions = rootView.getLaunchOptions();
WritableMap initialProps = launchOptions != null
? Arguments.fromBundle(launchOptions)
: Arguments.createMap();
String jsAppModuleName = rootView.getJSModuleName();
WritableNativeMap appParams = new WritableNativeMap();
appParams.putDouble("rootTag", rootTag);
appParams.putMap("initialProps", initialProps);
catalystInstance.getJSModule(AppRegistry.class).runApplication(jsAppModuleName, appParams);
}
ReactNative中Java与Js通信不再赘述。至此,启动Js层AppRegistry的runApplication启动Js Application。
/**
* AppRegistry.js
*/
runApplication: function(appKey: string, appParameters: any): void {
console.log(
'Running application "' + appKey + '" with appParams: ' +
JSON.stringify(appParameters) + '. ' +
'__DEV__ === ' + String(__DEV__) +
', development-level warning are ' + (__DEV__ ? 'ON' : 'OFF') +
', performance optimizations are ' + (__DEV__ ? 'OFF' : 'ON')
);
invariant(
runnables[appKey] && runnables[appKey].run,
'Application ' + appKey + ' has not been registered. This ' +
'is either due to a require() error during initialization ' +
'or failure to call AppRegistry.registerComponent.'
);
runnables[appKey].run(appParameters);
},

文章评论